Thursday, 25 August 2011
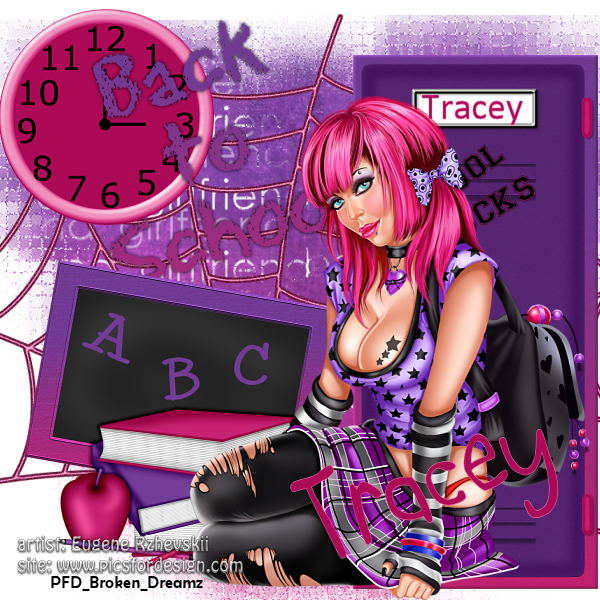
 Back To school
This Tutorial was created on the 25th August 2011 by broken dreamz scraps
Any tut like this is purley coincedental
Please do not take this as your own
Supplies needed are
Tube of choice im using the artwork of Eugine Rzhevski at PFD
Scrapkit School Rocks by broken dreamz here
Mask of choice
Open image 600x600
open paper 4 place as new layer use chosen mask
delete mask merge group
duplicate mask layer image mirror merge visible
copy edit paste as new layer your chosen tube i had to resize a couple of times to get tube to fit
open element 9 and resize by 35% copy edit paste as new layer and place behind the tube to the bottom behind her knees
open element 13 resize by 80% place behind the last element and tube
open elements 35 resize by 80% and place behind the tube and inbetween the other 2 elements
open elements 52 resize 50% and place in the top left corner
open element 20 and place so that it is going across the clock see tag for example
add your chosen name to the school locker and to the tag
add all copyright merge visible and resize by 80%
i hope you enjoyed the tutorial ty Tracey aka broken dreamz scraps
Monday, 4 July 2011
Harley Tutorial PTU

This tutorial was created by Broken Dreamz on the 4th july any tut like this is pure coincedence
Supplies
Tube i used Harley queen by Elias Chatzoudis he is ptu and get it here
Scrapkit Harley Queen by broken Dreamz scraps
new Image 600x600
open up the frame resize by 150% as the frame slightly small
open up tube of choice
magic wand click inside the frame
add tube
selections invert hit delete on tube layer
merge tube with the frame
with your move tool change it to pick and slightly tilt the image see tag for example duplicate image and mirror
place so that both frames are overlapping each other slightly
open up the flower resize by 30% and place underneath the frame layers
do this x2 so you have 3 flowers altogother and place around the frame
add main tube resize if needed and place in the centre of 2 frames
Open up the stars and place underneath frame layers and flower layers
open up the 2 faces and resize each by 30% tilt each one slightly and merge visible place at on corner of the frames
open up the bomb and resize by30% and place at the opposite corner of the frames to the faces
open up the scrolled ribbon
rexize by 60% add name of choice merge with the ribbon and rezize again by 50/60%
add all copyright and license numbers and merge visble resize tag if needed
4th July Tutorial

This Tutorial was created by Broken Dreamz Scraps 4th july 2011
any tut like this is pure coincedence
supplies needed
Scrapkit of choice i used 4th july by broken dreamz scraps
Tube of choice i used the great artwork of Keith Garvey he is PTU
get his License here
Mask of choice
Filter pent.com dot cross
Open new image 600x600
choose a paper and add to the blank image
use mask of choice
delete mask layer merge group
open up the star frame and resize by 80% copy edit paste as new layer
open up paper of choice and copy onto image
magic wand
click inside the star frame each part of it
selections modify expand 1
selections invert
on paper layer click delete
selections select none
move layer underneath frame
Open up tube of choice and place the head image over the star frame duplicate tube x2 and fill the star frame
merge tube layers Magic wand
click inside each part of the frame
selections modify expand 1
selections invert
on tube layer click delete
place tube layer between frame and paper layers
Effects
Penta.com/dot cross
use standard settings
Copy edit paste as new layer the main tube
place in the centre of the frame
with your text tool add text of choice and use a bevel setting of choice
add all copyright and license number
add name of choice and merge layers visible resize as needed
Thankyou for trying my tutortial
Subscribe to:
Posts (Atom)